Instructions
for Uploading V4.19.3 to Your Keypad
Print this page and follow these instructions
after you have downloaded keypad4193.exe from
the Astro-Physics website.
Please Read This First
Refer to the Check These Before You Start information before you proceed.
Setup the system
- Connect the power cable to the GTO control box. Since the motor cables are
not needed for the download, you can use just the GTO control box. The mount
does not need to be present. DO NOT connect the
keypad at this time. DO NOT turn the power on yet.
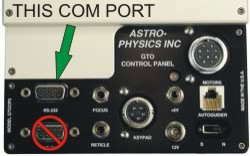
- GTOCP1, GTOCP2,
GTOCP3: Connect the RS-232 cable to your
personal computer and the GTO control box. This upload process will
only work if you plug the cable into the TOP
RS-232 connector (marked COM 1 on the GTOCP1 control
boxes). It will not work if you use the bottom connector. Please note that
COM1 on the GTOCP1 control box does not mean that you will necessarily be
using COM1 on your computer. You must use a "straight-through" serial
cable. Please read the infomation regarding serial cables below.
GTOCP4: You must use a "straight-through" serial
cable plugged into the TOP RS-232 connector. This is the
only port that will allow the pass-through of the data. USB, Ethernet
and WiFi Keypad downloads are not supported at this time. Connect the RS-232
cable to your personal computer and the GTO control box. Please read the
infomation regarding serial cables below.
Serial Cables: As mentioned above, your serial cable must
be "straight-through" (as
opposed to a "null
modem or crosswired"). We have 15' Straight-Through
Serial Cables available for purchase, if you do not already have one. Mounts
shipped in recent years included one of these cables.
If you require a USB-to-serial adapter, we recommend that you use one with
an FTDI chip or the Keyspan adapters. We do NOT recommend USB-to-serial
adapters with Prolific chips.
Test Procedure
You must follow these procedures EXACTLY.
If you do, the process is quite easy. Pay particular attention to what is connected
and powered on at various stages.
- Upgrading from all versions - your location data and other settings will be erased during this procedure. Please be sure to write all of the
settings that you wish to remember on a sheet of paper.
- IMPORTANT: Your keypad CANNOT be set to Auto-Connect YES for this upgrade. If your current version has the Auto-Connect feature, set it to NO or EXT. Menu path on the Keypad: 2=SETUP -> 3=Keypad Options -> 1=Auto-Connect:NO
-
SHUT OFF the power to the control box and UNPLUG the keypad. Do
NOT reconnect until instructed.
- Start
your PC. The keypad upgrade tool will run under
Windows 95 or later.
- Assuming that you
downloaded with the default file location settings,
select Start | Programs | Astro-Physics | Keypad
Loaderl v4.19.3. Select Keypad_ Loader_V4193.exe
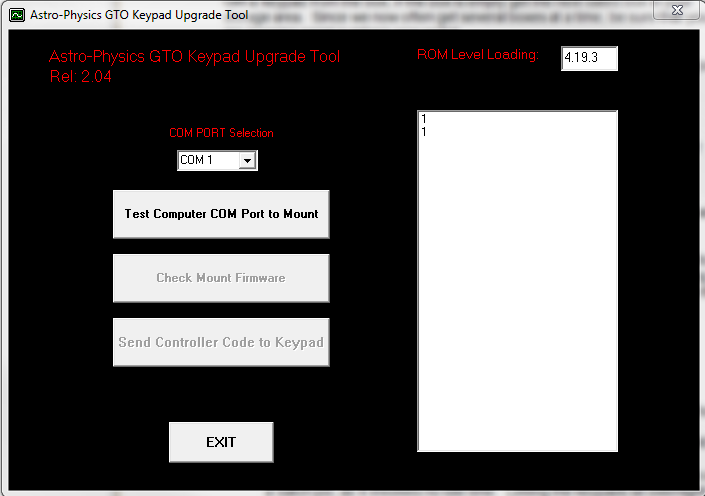
- The Keypad Update Tool window
will display. The white window should display two digits, one above the
other, corresponding to the COM port number in the selection box. It will
probably be two "1" digits. The ROM Level Loading
box will show the version number that you are about to load. If the box does
not display 4.19.3, then this is not the correct upgrade tool. Note: The
screen shot below shows an earlier version number.
- Double check to be sure your
serial cable is connected to the upper RS-232 port and your power cable
is connected. Remember that the keypad cable is not connected
at this point. Turn on the power
to your control box.
- Set COM port selection. The number selected will
display in the white box.
- Click on Test Computer COM Port to Mount. Message
should read "mount found". If not, check to be sure that your keypad is NOT plugged in. If it is, turn off the power to the control box, unplug the keypad and exit from the Keypad Upgrade Tool. After 30 seconds, turn the power back on and bring up the Keypad Upgrade Tool again. Repeat this step. If you have an error and the keypad is not plugged in, select another
COM port.
To select another computer COM port, it is best to exit the loader program completely, then restart it and select the next COM port before clicking on the Test Computer COM Port to Mount button. Repeat this if you need to select the next COM port and so on.
When the "mount found" message appears,
look at the entry in the white box. If it shows
a series of zeros followed
by a "#" sign (i.e. 00:00.0#), you have found the
correct COM port. If #:GR# appears in the white
box, then that COM port is connected to another
device, perhaps a modem or digital camera, etc.
If that is the case, try another COM port. Please
click "ok" to move on to the next step.
- Click the Check Mount Firmware button. The program
will poll the GTO control chip to determine if the
chip version number will support the upgrade procedure.
Chips issued prior to version "C" (shipped prior
to January 22, 2001) do not have the upgrade function.
The white box will display the chip version number
and "#" sign. Don't press the Send Controller Code
to Mount button yet. Please read on.
- If you have the proper chip, press "ok",
then turn off the power to your GTO control box.
Keep this Keypad Update window open in your web
browser since you will use it later. DO NOT press
any other buttons on the keypad just yet. Proceed
to the Keypad Update section below.
- If you get an error message, check all cables
and connections. Then click the Check Mount Firmware
button again TWO times (the first click will clear
the buffer and you will see an error code, click
it again). You will need to press "ok"
at each of the prompts.
- If the chip is an older version and fails this
test, contact Astro-Physics to obtain a new chip.
DO NOT attempt to continue this upgrade until you
install the new chip. Otherwise, you will erase
the old program with no means of installing the
new one.
Keypad Update
Do not try this procedure unless you have successfully completed the test above. Otherwise, you will erase the current program from your keypad. The screen will be blank and you will not be able to use your keypad.
Please follow these steps in order. If the power is interrupted, restart from step 1.
BE SURE THAT ALL OTHER PROGRAMS ON YOUR COMPUTER ARE CLOSED. SET YOUR SCREEN SAVER TO "NONE". DO NOT ATTEMPT TO USE YOUR COMPUTER WHILE THIS UPGRADE IS UNDERWAY.
- The power to the control
box should be off. If not, turn if off.
- Plug in the keypad and be sure that the power cable is connected to the GTO control
box and locked in place. The motor cables do not
need to be attached.
- Place the keypad on
a solid surface and press any three buttons (except
stop) simultaneously and hold them down. We call
this a "three-finger salute.".
As you are holding these three keys, apply the power
to the control box.
- A new display will
appear on the window of the keypad. At this point,
release the three buttons. Then, press the West
button to indicate YES for the next four windows.
The last window requesting to Test Flash must be
responded with NO by pressing the East button. This
will erase the current program. These are the screen
displays and the responses (note, the display says
"FN=No", however you will press the "E" button):
"Load defaults" -
Choose Yes (West)
"Are you sure" - Choose
Yes (West)
"Clear flash" - Choose
Yes (West)
"Are you sure" - Choose
Yes (West)
"Test flash" -
Choose No (East)
- Once you have completed
the previous step, the keypad will be placed in
a ready-to-receive mode. A blank window with the
blinking cursor in the upper left corner of the
screen will indicate this.
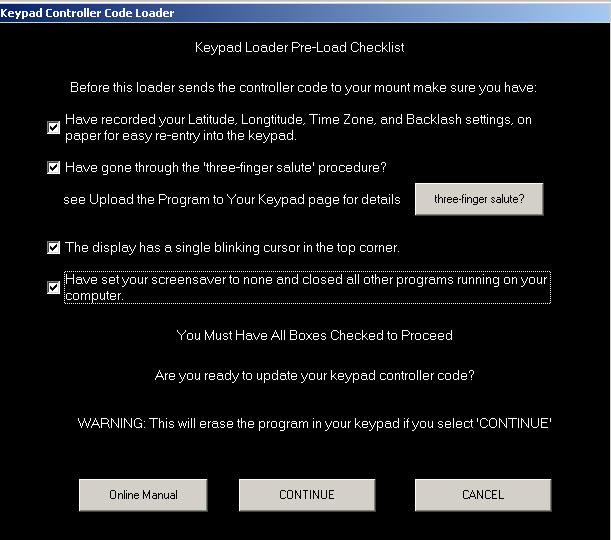
- Look back to the Keypad
Upgrade Tool window on your PC. Press the Send Controller
Code to Keypad button. The Keypad Loader Pre-Load
Checklist will appear. Review and check all boxes,
then press Continue.
- You will hear a series of beeps
from the keypad as uploading begins, but will get
no audible feedback during the rest of the upload.
From this point on, the upload can take anywhere
from 20 minutes to 35 minutes. Do not remove the
power from the mount. Do not try to run any other
application during this time. If you happen to check
the task manager of your OS, it will state that
the program is not responding, however it really
is running properly, just slowly. Since the program
must run through the control box into the keypad,
it cannot run very fast. Make yourself a cup of
tea (or your favorite beverage).
- As the upload progresses,
the white display box within the Upgrade Tool Utility
will display a few lines of code, then go dormant
for quite a few minutes. Don't worry, the upload
is working properly. New code will display periodically,
then pause again. If you have any difficulties with
the download, please write down the first 10 lines
that appear in the box so that we can help to diagnose
the problem.
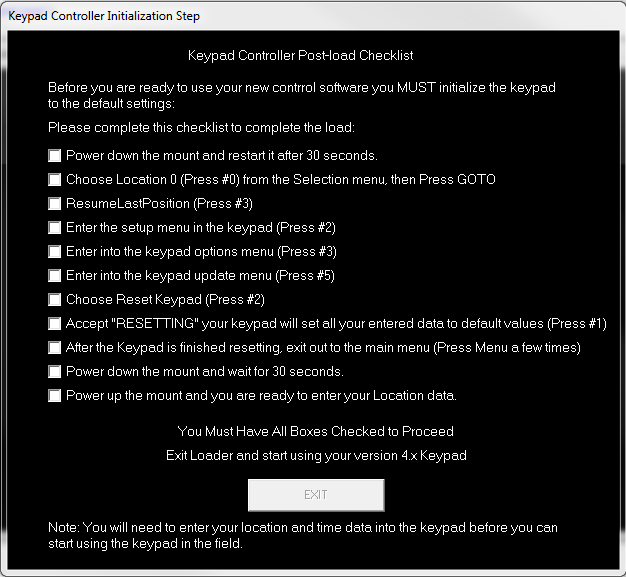
-
When the upload is complete, the screen on the Keypad will display the new
version number. On your computer screen, the Keypad Controller Post-load
Checklist will appear. Please follow each step
of the process carefully. This part of the process will set all personal
settings to the default settings. We provided
checkboxes to help you keep your place. If you accidentally
press the wrong button on the keypad, remove power
to the control box and follow the steps on the post-load
checklist again.
- Your GTO keypad is
now updated to the new EPROM code and is ready to
use. Turn the power to the control box off, wait
30 seconds, then turn back on. If the location selection
screen comes up first, enter 0 and press GOTO. Then,
press ResumeLastPosition to get to the Main Menu.
If the keypad is locked up on the Astro-Physics
4.19.3 screen, it is likely that Auto-Connect was
set to YES prior to the upgrade. Please follow the
instructions below to resolve this issue.
- Please refer to the
4.1x Information Manual for further instructions.
What
to do if the keypad is locked up on Astro-Physics
4.19.3 screen
These are known causes related to the keypad. If
you are unable to resolve the lockup with the suggestions
below, there may be other electrical or mechanical
reasons. Please call Astro-Physics.
The power was not turned off for a long enough period of time. Be sure to turn the power to the control box off for at least 30 seconds.
The keypad was set to Auto-Connect YES.
To resolve this problem:
- Establish a link to the mount with external software.
- Set up the mount with the power cable. DO NOT PLUG
IN THE KEYPAD.
- Bring up an external computer program that will control the mount - TheSky,
Starry Night, etc.
- Link to the mount with the software program.
- Confirm that you are linked, for instance, slew to an object.
- After you are linked, plug in the keypad.
- The keypad should go to the Main Menu.
Back to top
Copyright © 2016-2018, Astro-Physics, Inc. - All Rights Reserved
This page was last modified: January 16, 2020
Astro-Physics, Inc.
11250 Forest Hills Road, Machesney Park, IL 61115, U.S.A.
Phone: 815-282-1513 Fax: 815-282-9847