Astro-Physics
Keypad v4.xx Database - Corruption and Reloading - Original non-JAVA Method
If your computer has JAVA loaded and your GTOCP4 has P02-01
or later firmware, use this procedure: Java
Keypad Loader for Database Load
What is Program vs Database Firmware for the GTO Keypad?
The GTO Keypad Firmware consists of two separate parts
that occupy two separate memory areas in the Keypad:
- Program firmware: This firmware contains all program
logic for the functions, menus, entry screens and all other aspects concerned
with the operation of the keypad. It also includes the calculated values of
the solar system objects and calibration stars. The keypad version number
displays when you start your keypad.
- Database firmware: The database firmware contains
the information in the object database. This includes the catalog name, common
name, RA and Declination coordinates, magnitude, object type, and constellation
where the object is located. All keypads up to and including version 4.19
of the program firmware have the database level:1. The database remains in
memory even when the program version changes. It does not need to be reloaded
unless the database corrupts.
Corrupted Database
You may need to reload your database if you attempt to slew to an object catalog (Messier, NGC, etc) and your telescope moves to the wrong location or indicates that the object is below the horizon (and you know it is not). Check the coordinates of that item on the keypad (refer to your manual for instructions on how to do this). If the following information is incorrect, your database is corrupted: coordinates, object type, constellation or magnitude. Note that your keypad will slew to stars and planets correctly since the calculations and data for these objects reside in a different memory location.
Known causes of database corruption:
- If your keypad is dropped or suffers a blow that causes the internal battery to shift from its position momentarily and lose contact. This is unlikely to happen to keypads with serial number 1568GTO or later due to the different configuration of the battery.
- Your keypad battery needs to be changed. Battery life is estimated to be 5 years at room temperature. If you reload the database and it corrupts again a short time later, the battery may not have enough voltage.
The procedures below will enable you to reload your
database. In order to use this database loader, you must have the following:
- GTOCP1 and GTOCP2 Microprocessor chip: Determine
if you can use this database loader by removing the cover of the GTOCP1
or GTOCP2 control box. The label on the chip must be dated January 22,
2001 or later. Chips with an earlier date or no label at all, must be upgraded.
- GTOCP3 and GTOCP4: All control boxes can use the database loader.
- Keypad firmware version: Must be at least 4.12 to 4.19.5. Do not
use this database for v5 keypad firmware.
Important Note: On
rare occasions, you may get an error message when attempting to run the “database_loader.exe". [Error
message: “Handloader
Component 'MSCOMM32.OCX' or one of its dependencies not correctly registered: a file is missing or invalid."] This means that your computer is missing a file component that helps COM Port communication. Simply download “MSCOMM32.OCX" (from a Google search) and place it in “C:\windows\system32" folder (XP, Vista, or Windows 7 32bit) or in the “SysWOW64" folder (Windows 7 64bit).
We strongly suggest that you print these instructions.
Later in the proceedure you will need to close all programs including your
browser leaving you without access.
Download from the Internet or CD
- Click on database_loader.exe
- The file must be downloaded to the drive of your choice. Make a note of where you stored the file so you can find it later.
- Find the database_loader.exe file that you just downloaded. Click on it to run the installer program. Follow the instructions on your screen.
Setup the system
- Before starting, set your keypad
to: Auto-Connect = YES. (Main Menu. 2=Setup. 3=Keypad Options. 1 toggles
to Auto-Connect = Yes) Once this is set, DISCONNECT the power to the GTO
control box and DISCONNECT the keypad from the GTO Control Box.
- Re-connect
the power cable to the GTO control box. Since the motor cables are not
needed for the download, you can use just the GTO control box, you dont
have to use the whole mount. DO NOT connect the keypad at this time. DO
NOT turn the power on yet.
- Connect the RS-232 cable to your personal computer and the GTO control box. This upload process will only work if you
plug the cable into the TOP RS-232 connector (marked COM 1 on the GTOCP1 control boxes). It will not work if you use
the bottom connector. You must also use a "straight through" (as opposed to a "null modem or crosswired") serial
cable. We now have these Straight Through Serial Cables as well as USB to Serial Adapters available for purchase.
Please note that COM1 on the control box does not mean that you will necessarily be using COM1 on your computer.
Test Procedure
- IMPORTANT: These instructions assume that your keypad is set to Auto-Connect YES.
- Start
your PC. The Keypad Database Loader Tool will run under
Windows 95 or later.
- Assuming that you
downloaded and installed the tool with the default file location settings,
select Start | Programs | Astro-Physics | Keypad
Data Base Loader Tool. The GTO Keypad Update Tool
window will display. The white window should display
two digits, one above the other, corresponding to
the COM port number in the selection box. It will
probably be two "1" digits.
- Double check to be sure your cables are connected
as described above, then turn on the power to your
control box. Remember that the keypad cable is not
connected at this point.
- Set COM port selection. The number selected will
display in the white box.
- Click on the button labeled Test Computer COM Port to Mount. Message
should read "mount found". If not, check to be sure
that your keypad is NOT plugged in. If it is, turn
off the power to the control box, unplug the keypad
and exit from the Keypad Upgrade Tool. After 30
seconds, turn the power back on and bring up the
Keypad Upgrade Tool again. Repeat this step. If
you have an error message and the keypad is not plugged
in, select another COM port.
To select another computer COM port, it is best to exit the loader program completely, then restart it and select the next COM port before clicking on the Test Computer COM Port to Mount button. Repeat this if you need to select the next COM port and so on.
When the "mount found" message appears, look at
the entry in the white box. If it shows a series
of zeros
followed by a "#" sign (i.e. 00:00.0#), you have
found the correct COM port. If #:GR# appears in
the white box, then that COM port is connected to
another device, perhaps a modem or digital camera,
etc. If that is the case, try another COM port.
Please click "ok" to move on to the next
step.
- Click the Check Mount Firmware button. The program
will poll the GTO control chip to determine if the
chip version number will support the upgrade procedure.
Chips issued prior to version "C" (shipped prior
to January 22, 2001) do not have the upgrade function.
The white box will display the chip version number
and "#" sign. Don't press the Send Controller Code
to Mount button yet. Please read on.
- If you get an error message, check all cables
and connections. Then click the Check Mount Firmware
button again TWO times (the first click will clear
the buffer and you will see an error code, click
it again). You will need to press "ok"
at each of the prompts.
- If the chip is an older version and fails this
test, contact Astro-Physics to obtain a new chip.
DO NOT attempt to continue this upgrade until you
install the new chip.
Database Upload
Do not try this procedure unless you have successfully completed the test above.
Please follow these steps in order. If the power is interrupted, restart from step 1.
BE SURE THAT ALL OTHER PROGRAMS ON YOUR COMPUTER
ARE CLOSED (INCLUDING VIRUS
AND SPYWARE PROTECTION AND YOUR BROWSER). SET YOUR SCREEN SAVER TO "NONE".
DO NOT ATTEMPT TO USE YOUR COMPUTER FOR ANYTHING ELSE WHILE THIS LOAD IS UNDERWAY.
- The power to the control
box should be on.
- Plug in the keypad and be sure that the power
cable is connected to the GTO control box and locked in place. The motor
cables do not need to be attached.
- If your Auto-Connect is set to YES, the main
menu will appear. Please follow the steps below for the firmware version
loaded on your keypad.
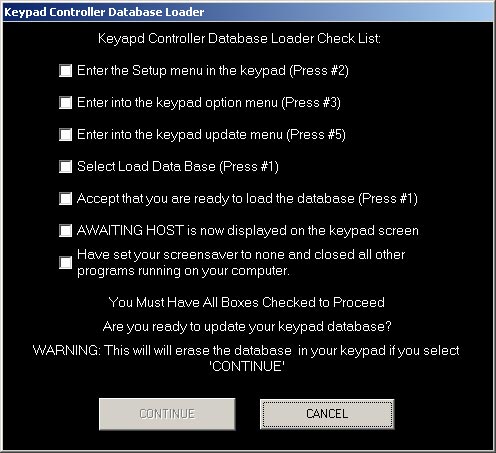
Keypad Firmware Version 4.12 or later -
Press the Send Database to Keypad button on your computer screen. Follow
the instructions that will appear (as shown below) and click off each
step as you go. When you have clicked all of the boxes, the Continue button
will be active. Click on that button.
- As the database loads into the keypad, you
will see the word CONNECTED on the top of the keypad display as well as
the following words: Data:, Writing Page:, Writing Data: in the white box
on the computer screen. You will also see numbers rapidly scrolling. Please
note: The upload process may take well over half an hour to complete. WARNING:
If you do not see the word CONNECTED on the keypad screen, but instead
AWAITING HOST remains, you probably have a keypad firmware version prior
to 3.20 and you will not be able to load the database without first upgrading
your firmware.
- As the upload progresses,
the white display box within the Keypad Database Loader
will display a few lines of code, then go dormant
for quite a few minutes. Don't worry, the upload
is working properly. New code will display periodically,
then pause again. If you have any difficulties with
the download, please write down the first 10 lines
that appear in the box so that we can help to diagnose
the problem.
- When the upload is finished, the keypad will
display the message: "Done. Press MENU to exit." Press the MENU
button 5 times in succession to return to the main menu. Your GTO keypad
is now loaded with the proper database and is ready to use. Turn the power
to the control box off, wait 15 seconds, then turn back on and you are
ready to go!.
Back to top
Copyright © 2018-2022,
Astro-Physics, Inc. - All Rights Reserved
This page was last modified:
June 29, 2022
Astro-Physics, Inc.
11250 Forest Hills Road, Machesney Park, IL 61115, U.S.A.
Phone: 815-282-1513 Fax: 815-282-9847
