Upload V4.20 Database to Your Keypad

Follow these instructions after you have downloaded keypad420.exe and keypad420_database.exe from the Astro-Physics website.

Setup the system

  1. Connect the power cable to the GTO control box. Since the motor cables are not needed for the download, you can use just the GTO control box, you don’t have to use the whole mount. DO NOT connect the keypad at this time. DO NOT turn the power on yet.


  2. Connect the RS-232 cable to your personal computer and the GTO control box. This upload process will only work if you plug the cable into the TOP RS-232 connector (marked COM 1 on the GTOCP1 control boxes). It will not work if you use the bottom connector.

Test Procedure

  1. Start your PC. The keypad upgrade tool will run under Windows 95 or later.


  2. Assuming that you downloaded with the default file location settings, select Start | Programs | Astro-Physics | Keypad Databsae Loader Ver 4.20 UP ROMS. The Keypad Database Loader Tool window will display. The white window should display two digits, one above the other, corresponding to the COM port number in the selection box. It will probably be two "1" digits. The Database for ROM Level Loading box will show the version number that your about to load the database for. If the box does not display 4.2, then this is not the correct Database upgrade tool.


  3. Double check to be sure your cables are connected as described above, then turn on the power to your control box. Remember that the keypad cable is not connected at this point.


  4. Set COM port selection. The number selected will display in the white box.


  5. Click on Test Computer COM Port to Mount. Message should read "mount found". If not, check to be sure that your keypad is NOT plugged in. If if is, turn off the power to the control box, unplug the keypad and exit from the Keypad Database Load Tool. After 30 seconds, turn the power back on and bring up the Keypad Upgrade Tool again. Repeat this step. If you have an error and the keypad is not plugged in, select another COM port.

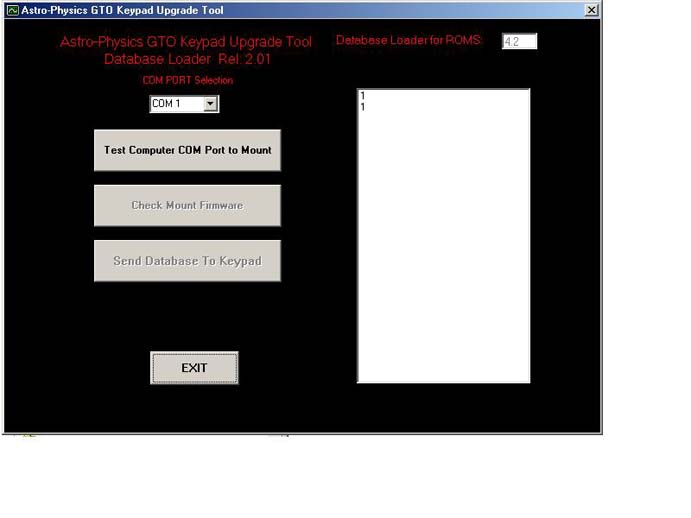
    When the "mount found" message appears, look at the entry in the white box. If it shows a series of zeros followed by a "#" sign (i.e. 00:00.0#), you have found the correct COM port. If #:GR# appears in the white box, then that COM port is connected to another device, perhaps a modem or digital camera, etc. If that is the case, try another COM port. Please click "ok" to move on to the next step.


  6. Click the Check Mount Firmware button. The program will poll the GTO control chip to determine if the chip version number will support the upgrade procedure. Chips issued prior to version "C" (shipped prior to January 22, 2001) do not have the upgrade function. The white box will display the chip version number and "#" sign. Don't press the Send Controller Code to Mount button yet. Please read on.


  7. If you have the proper chip, press "ok", then turn off the power to your GTO control box. Keep this Keypad Update window open in your web browser since you will use it later. DO NOT press any other buttons on the keypad just yet. Proceed to the Keypad Update section below.


  8. If you get an error message, check all cables and connections. Then click the Check Mount Firmware button again TWO times (the first click will clear the buffer and you will see an error code, click it again). You will need to press "ok" at each of the prompts.

  9. If the chip is an older version and fails this test, contact Astro-Physics to obtain a new chip. DO NOT attempt to continue this upgrade until you install the new chip. Otherwise, you will erase the old program with no means of installing the new one.

Keypad Database Load

Upgrading the Database for Version 4.20+ ROMS - The new 4.20+ ROMS use a new database. Do not mix older database releases with the new 4.20+ ROMS as the RA/DEC values for objects will not be correct.

Please follow these steps in order. If the power is interrupted, restart from step 1.

BE SURE THAT ALL OTHER PROGRAMS ON YOUR COMPUTER ARE CLOSED. SET YOUR SCREEN SAVER TO "NONE". DO NOT ATTEMPT TO USE YOUR COMPUTER WHILE THIS UPGRADE IS UNDERWAY.

  1. The power to the control box should be off. If not, turn if off.
  2. Plug in the keypad and be sure that the power cable is connected to the GTO control box and locked in place. The motor cables do not need to be attached.
  3. Place the keypad on a solid surface and power on the mount now.
  4. Please go through a NORMAL startup procedure. We recommend you select the '1=Star Sync' to quickly and easily get to the main menu.

  5. Once you have completed the previous step and have reached the main memu, you have to place the keypad in the database receive mode.
  6. Step 1- Select option '2=Setup' from the main menu
  7. Step 2- Select option '3=Keypad Options'
  8. Step 3- Select option '5=Keypad Update'
  9. Step 4- Select option '1=Load Data Base' from the Keypad Upgrade Menu
  10. A new window will appear prompting you to 'Confirm you are sure' you wish to load the new database. Select the '1=Load' at this time.
  11. The Keypad will now display the ' -- Awaiting Host -- ' message.
  12. Now GO and PRESS the 'Send Database to Keypad' button on the Database Loader main window running on your PC.

  13. Once started, the keypad window will display the database loading counters, this is normal. Their are 13 banks of information to load, and will be indicated both on the keypad window and on the Database Loader tool window running on your PC.

  14. This process will now take around 1 hour to complete. When completed, the keypad window will display the 'Done.' message. Simply press the Menu button now to return to the Main keypad menu. Power down the mount, exit the database loader tool, your keypad is now updated to the new database. Use as normal now.

Home
Back to top

Copyright © 2004, Astro-Physics, Inc. - All Rights Reserved
This page was last modified: January 17, 2016

Home
Astro-Physics, Inc.
11250 Forest Hills Road, Rockford, IL  61115, U.S.A.
Phone: 815-282-1513   Fax: 815-282-9847